Anvil Model
Simengine can support various topology layouts; In this section we will attempt to model alteeve’s high-availability system called Anvil which consists of 2 striker dashboard machines, 2 target servers with IPMI interface, 2 PDUs, 2 Switches and 2 UPSes. High-level system map can be found on alteeve’s wiki page.
This table summarizes the general layout of the simengine system model we are going to configure:
| key | Name | Type | Address | Interface |
|---|---|---|---|---|
| 1 | outlet-1 | outlet | ||
| 2 | outlet-2 | outlet | ||
| 3 | ups01 | ups | SNMP → reachable at 10.20.3.1 (default port 161) | bcn1_bridge1:1 |
| 4 | ups02 | ups | SNMP → reachable at 10.20.3.2 | bcn1_bridge1:2 |
| 5 | pdu01 | pdu | SNMP → reachable at 10.20.2.1 | bcn1_bridge1:3 |
| 6 | pdu02 | pdu | SNMP → reachable at 10.20.2.2 | bcn1_bridge1:4 |
| 7 | an-a01n01 | server-bmc | IPMI → reachable at 10.20.11.1 (or from the VM) | bcn1_bridge1:5 |
| 8 | an-a01n02 | server-bmc | IPMI → reachable at 10.20.11.2 (or from the VM) | bcn1_bridge1:6 |
| 9 | an-striker01 | server | ||
| 10 | an-striker02 | server |
an-a01n01 and an-a01n02 are two managed servers whereas an-striker01 and an-striker02 are two nodes running control software "Striker Dashboard".
4 VMs will be running so the host machine should preferably have more than 4 cores (ideally, 500GB available disk space, 8 CPU cores and 32GB memory).
VM
4 VMs will be managed by the simulation engine — an-a01n01 & an-a01n02 will be running Fedora 28 and striker dashboards (an-striker01 & an-striker02) will be hosted on CentOS-based system.
[root@host enginecore]$ virsh list --all
Id    Name                           State
----------------------------------------------------
-     an-a01n01                      shut off
-     an-a01n02                      shut off
-     an-striker01                   shut off
-     an-striker02                   shut off
The installation of the VMs plus minor setup need to be performed prior to the system modelling stage. You can use the official 'anvil-generate-iso' tool to create striker dashboards (see An!Wiki page for more details).
Resources
For hardware resources, it is recommended to allocate:
Memory:
8192 MiBper eachan-a01n0xnode1024 MiBper eachan-striker0xcontrol server
Storage:
100 Gibper eachan-a01n0xnode50 Gibper eachan-striker0xcontrol server
BMC and storcli64
Since 2 VMs ( an-a01n01 & an-a01n02 ) will support BMC/IPMI interface and storcli64, we will need to have lanplus interface and qemu options configured;
Once you install the target operating systems, shut down the VMs and configure .xml args as following:
an-a01n01
Update .xml configurations:
sudo virsh edit an-a01n01
You will need to change the top-level tag to <domain type='kvm' xmlns:qemu='http://libvirt.org/schemas/domain/qemu/1.0'> and also add qemu command line arguments (after </devices>):
 <qemu:commandline>
    <qemu:arg value='-chardev'/>
    <qemu:arg value='socket,id=ipmi0,host=127.0.0.1,port=9002,reconnect=2'/>
    <qemu:arg value='-device'/>
    <qemu:arg value='ipmi-bmc-extern,id=bmc0,chardev=ipmi0'/>
    <qemu:arg value='-device'/>
    <qemu:arg value='isa-ipmi-bt,bmc=bmc0'/>
    <qemu:arg value='-serial'/>
    <qemu:arg value='mon:tcp::9012,server,telnet,nowait'/>
    <qemu:arg value='-chardev'/>
    <qemu:arg value='socket,id=simengine-storage-tcp,host=localhost,port=50000,reconnect=2'/>
    <qemu:arg value='-device'/>
    <qemu:arg value='virtio-serial'/>
    <qemu:arg value='-device'/>
    <qemu:arg value='virtserialport,chardev=simengine-storage-tcp,name=systems.cdot.simengine.storage.net'/>
  </qemu:commandline>
an-a01n02
Almost identical steps need to be performed for the second VM (note that ipmi socket is assigned a different port this time (port=9102) which we will later pass as one of the command line arguments to simengine-cli).
sudo virsh edit an-a01n02
Change the top-level tag to <domain type='kvm' xmlns:qemu='http://libvirt.org/schemas/domain/qemu/1.0'> , add qemu command line arguments (after </devices>) as following:
<qemu:commandline>
    <qemu:arg value='-chardev'/>
    <qemu:arg value='socket,id=ipmi0,host=127.0.0.1,port=9102,reconnect=2'/>
    <qemu:arg value='-device'/>
    <qemu:arg value='ipmi-bmc-extern,id=bmc0,chardev=ipmi0'/>
    <qemu:arg value='-device'/>
    <qemu:arg value='isa-ipmi-bt,bmc=bmc0'/>
    <qemu:arg value='-serial'/>
    <qemu:arg value='mon:tcp::9012,server,telnet,nowait'/>
    <qemu:arg value='-chardev'/>
    <qemu:arg value='socket,id=simengine-storage-tcp,host=localhost,port=50001,reconnect=10'/>
    <qemu:arg value='-device'/>
    <qemu:arg value='virtio-serial'/>
    <qemu:arg value='-device'/>
    <qemu:arg value='virtserialport,chardev=simengine-storage-tcp,name=systems.cdot.simengine.storage.net'/>
  </qemu:commandline>
storcli64
You will need to upload storcli64 binary to the target vms (an-a01n01 and an-a01n02) bin folder /usr/bin and make them executable by running chmod +x /usr/bin/storcli64.
The binary can be found in simengine repo: link
Network Configuration
Virtual Network
You will need to define 4 virtual networks (sn1_bridge1, sn2_bridge1 and bcn1_bridge1, bcn2_bridge1) using net-define script and configure virtual NICs for the VMs;
Using Virsh .XML
One way to connect guests to the newly-defined interfaces is to copy <interface>...</interface> tags in an-*.xml vm config dump files located in data folder and paste in xml configuration by running virsh edit for all 4 vms;
Virt-Manager Tool (Alternative to Using Virsh .XML)
Alternatively, you can use virt-manager GUI - double-click a vm and configure hardware in the Show Virtual Hardware details tab (lightbulb icon);
Each an-a01n0x vm will have 6 virtual network interfaces configured, whereas Striker systems an-striker0x will be using 2 virtual network interfaces.
an-a01n0x NAT (repeat this step for all anvil nodes):
1) Click Add Hardware and select Network
2) Select default NAT as "Network source"
3) Select e1000 as its "Device Model"
4) Click finish and add another NAT nic using the steps outlined above
an-a01n0x Isolated network sn1_bridge1 (repeat this step for all anvil nodes):
1) Click Add Hardware and select Network
2) Select Virtual network sn1_bridge1 isolated network as "Network source"
3) Select e1000 as its "Device Model"
4) Click finish and add another Isolated Network nic using the steps outlined above
an-a01n0x Isolated network bcn1_bridge1 (repeat this step for all anvil nodes):
1) Click Add Hardware and select Network
2) Select Virtual network bcn1_bridge1 isolated network as "Network source"
3) Select e1000 as its "Device Model"
4) Click finish and add another Isolated Network nic using the steps outlined above
an-striker0x NAT (repeat this step for all striker nodes):
1) Click Add Hardware and select Network
2) Select default NAT as "Network source"
3) Select e1000 as its "Device Model"
an-striker0x Isolated network bcn1_bridge1 (repeat this step for all striker nodes):
1) Click Add Hardware and select Network
2) Select Virtual network bcn1_bridge1 isolated network as "Network source"
3) Select e1000 as its "Device Model"
Host Network
We will need to allocate IP addresses for the SNMP simulators on the host machine (machine that will run simengine). In this example, we will temporarily add network interfaces and assign IP addresses:
ifconfig bcn1_bridge1:1 10.20.3.1/16
ifconfig bcn1_bridge1:1 netmask 255.255.0.0

ifconfig bcn1_bridge1:2 10.20.3.2/16
ifconfig bcn1_bridge1:2 netmask 255.255.0.0

ifconfig bcn1_bridge1:3 10.20.2.1/16
ifconfig bcn1_bridge1:3 netmask 255.255.0.0

ifconfig bcn1_bridge1:4 10.20.2.2/16
ifconfig bcn1_bridge1:4 netmask 255.255.0.0

ifconfig bcn1_bridge1:5 10.20.11.1/16
ifconfig bcn1_bridge1:5 netmask 255.255.0.0

ifconfig bcn1_bridge1:6 10.20.11.2/16
ifconfig bcn1_bridge1:6 netmask 255.255.0.0
Note
You may need to re-configure your firewall and expose port 161 (SNMP) as well as port 623 (IPMI) to the striker systems.
e.g.
bash
$ iptables -I INPUT -p udp -m udp --dport 161 -j ACCEPT
$ iptables -I INPUT -p udp -m udp --dport 623 -j ACCEPT
Note
Network assignment will be lost on system reboot, make sure to run the script on system start
System Model
At this stage, we should be ready to model our high-availability hardware topology. Drop the existing model in case the data store is not empty:
simengine-cli model drop
And pause the engine daemon:
sudo systemctl stop simengine-core
Running the source code below should re-create the Anvil topology; model create will add new assets to the data store & model power-link will link assets together:
# Create 2 outlets, one powers 'an-ups01' another one powers 'an-ups02'
simengine-cli model create outlet --asset-key=1 -x=-861 -y=-171
simengine-cli model create outlet -k2 -x=-861 -y=351

# Add 2 UPSs
simengine-cli model create ups -k=3 \
    --name=an-ups01 \
    --host=10.20.3.1 \
    --mask=255.255.0.0 \
    --port=161 \
    --interface="bcn1_bridge1:1" \
    --serial-number="SVPD4D5QTQ3V" \
    --mac-address="f2325a5b0824" \
    -x=-895 -y=-182
simengine-cli model create ups -k=4 \
    --name=an-ups02 \
    --host=10.20.3.2 \
    --mask=255.255.0.0 \
    --port=161 \
    --interface="bcn1_bridge1:2" \
    --serial-number="8IAIMD9RX6KZ" \
    --mac-address="8117f9db70d4" \
    -x=-895 -y=347

# Create 2 PDUs
simengine-cli model create pdu -k=5 \
    -n=an-pdu01 \
    --host=10.20.2.1 \
    --mask=255.255.0.0 \
    --port=161 \
    --interface="bcn1_bridge1:3" \
    --serial-number="AQ5AKU1OORAX" \
    --mac-address="37436ab3c583" \
    -x=-36 -y=-161

simengine-cli model create pdu -k=6 \
    -n=an-pdu02 \
    --host=10.20.2.2 \
    --mask=255.255.0.0 \
    --port=161 \
    --interface="bcn1_bridge1:4" \
    --serial-number="95SQW45SVIFX" \
    --mac-address="b7bc37aa4d83" \
    -x=-36 -y=567

# Add 2 Servers
simengine-cli model create server-bmc -k=7 \
    --domain-name=an-a01n01 \
    --power-consumption=360 \
    -x=-162 -y=320 \
    --host=10.20.11.1 \
    --port=623 \
    --interface="bcn1_bridge1:5"
simengine-cli model create server-bmc -k=8 \
    --domain-name=an-a01n02 \
    --power-consumption=360 \
    --host=10.20.11.2 \
    --port=623 \
    --vmport=9102 \
    --storcli-port=50001 \
    -x=-171 -y=86 \
    --interface="bcn1_bridge1:6"

# Add 2 Striker Servers
simengine-cli model create server -k=9 --domain-name=an-striker01 --power-consumption=240 --psu-num=1 -x=738 -y=101
simengine-cli model create server -k=10 --domain-name=an-striker02 --power-consumption=240 --psu-num=1 -x=734 -y=326

### Power Components
# connect outlets & UPSs
simengine-cli model power-link -s1 -d3   # {_Mains_}==>[an-ups01]
simengine-cli model power-link -s2 -d4   # {_Mains_}==>[an-ups02]

# connect ups & pdus
simengine-cli model power-link -s31 -d5  # [an-ups01]==>[an-pdu01]
simengine-cli model power-link -s41 -d6  # [an-ups02]==>[an-pdu02]

# Power up servers
simengine-cli model power-link -s51 -d72 # [an-pdu01]={port-1}=>{psu-2}=>[an-a01n01]
simengine-cli model power-link -s52 -d82 # [an-pdu01]={port-2}=>{psu-2}=>[an-a01n02]

simengine-cli model power-link -s61 -d71 # [an-pdu02]={port-1}=>{psu-1}=>[an-a01n01]
simengine-cli model power-link -s62 -d81 # [an-pdu02]={port-2}=>{psu-1}=>[an-a01n02]

# Power Up Striker Servers
simengine-cli model power-link -s58 -d91  # [an-pdu01]={port-8}=>{psu-1}=>[an-striker01]
simengine-cli model power-link -s68 -d101 # [an-pdu02]={port-8}=>{psu-1}=>[an-striker02]
Re-start the daemon:
sudo systemctl start simengine-core
You can verify that the simulators are running by issuing:
ps aux | grep snmpsimd # should show 4 instances
ps aux | grep ipmi_sim # should show 2 instances
First Run
The front-end web-page will display assets in the following arrangement:
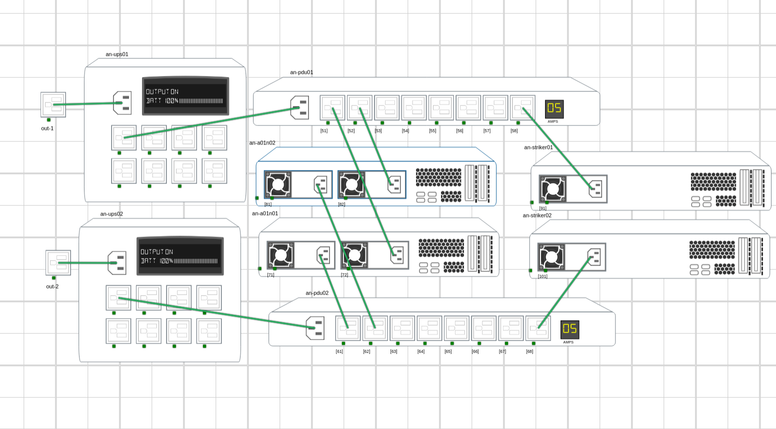
You can customize the layout by positioning the assets in the preferred way. Click on gear ⚙️ icon & choose ‘Save Layout’ to save new asset coordinates;

Management
Make sure all 6 hardware assets (2 UPSes, 2 PDUs and 2 Anvil Nodes) are reachable from the striker servers an-striker01 and an-striker01 prior to launching installation step with the striker dashboard. Double check your firewall rules if both snmpsimd and ipmi_sim processes are running but network interfaces appear unavailable.
Once this step is completed, you can proceed to building anvil cluster.
UPS
UPSes’ SNMP interface can be reached at 10.20.3.1 & 10.20.3.2
For example:
snmpwalk -Cc -c public -v 1 10.20.3.1 .1.3.6.1.4.1.318.1.1.1.2.2
snmpwalk -Cc -c public -v 1 10.20.3.2 .1.3.6.1.4.1.318.1.1.1.2.2
More documentation on UPS management can be found here: link;
PDU
PDUs SNMP interface is accessible at 10.20.2.1 & 10.20.2.2
For example:
snmpwalk -Cc -c public -v 1 10.20.2.1
snmpwalk -Cc -c public -v 1 10.20.2.2
Server-BMC
Servers that support BMC interface can be accessed from both host machine & the VMs:
Running from host example:
ipmitool -H 10.20.11.1 -U ipmiusr -P test sdr list # server 7 (an-a01n01)
ipmitool -H 10.20.11.2 -U ipmiusr -P test sdr list # server 8 (an-a01n02)
Or inside anvil VMs:
sudo ipmitool sdr list
storcli64
You can test storcli64 from one of the vms (an-a01n01 or an-a01n02) by running:
storcli64 /c0 show all
Power Management
You can retrieve status of individual assets by issuing:
simengine-cli status -k1 # is out-1 up?
And power them up/down:
simengine-cli power down -k1 # out-1 is down
More information on asset management including storage and thermal relationships can be found here: link;
Model Updates
You can update the existing model (for example, update UPS snmp ip address or server’s power consumption);
Note
Any model changes require simengine-core service restart;
see simengine-cli model update for more information;